Posted on 27 Comments

Show Off Time

When Waldorf inspired baby pattern was presented to you few weeks ago I’ve made a promise to show you some of the works form ladies that have helped testing the pattern long before you saw it. For that reason I feel honored to show and share their work, and this is little something I can do to thank them for their time and kind help.

Aimee Grace by Amanda Pinkie Crawford

Aimee Grace by Amanda Pinkie Crawford collageMatilda by Araceliz Alvira

Matilda by Araceliz Alvira

Brenda Kools Underwood

Brenda Kools Underwood

Cynthia Chiu

for more photos on how Cynthia made her baby press the  here

Cynthia Chiu‎

Fernanda Risseto Delfino Candeo

more of her work you can find on her lovely blog

http://teiadecarinhos.blogspot.com.br/2015/03/boneca-tipo-waldorf-articulada-em.html

Fernanda Risseto Delfino Candeo

Jeanne Chambers LeMoine‎

Jeanne Chambers LeMoine‎

Ballerina Baby by Susan Surane Melcher

For Susan’s FB page find info and photos here

11077382_10205551065889611_6787316179454877214_o

Ballerina Baby by Susan Surane Melcher

And Nordic baby girl Kraka by Ingrid Friis Rafn

Nordic babygirl Kraka by Ingrid Friis Rafn

Thank you dear ladies for all your help on this pattern.

I am really lucky to have such a wonderful friends.

Great and wonderful work done by all of you.

Waldorf Baby FB group testing

Posted on 11 Comments

Gift of Love and Gift of Life

The Little Yellow Duck project/day is tomorrow!

I feel very sorry I came little bit late with this post and pattern but thinking as this is so very easy one, and fast one to do, you might still have time to make at least one little duck and make someone randome happy tomorrow.

What is the Little Yellow Duck Project?

The Little Yellow Duck Project involves people around the world handcrafting little yellow duck gifts as random acts of kindness that are left in public places for others to find. A special tag on each one invites the finder to take their gift home to brighten their day and to visit this website to register where they found their gift. We hope that the stories and information found here will encourage them to pledge their own random act of kindness by registering to donate blood, bone marrow, organs tissues.”

Home

More about Little Yellow Duck Project you can find on above link. On the same link you can find few of little duck patterns (crochet, knitting, sewing…), as well as special tags that go with ducks.

For this special event I have created simple duckling brooch. Who wouldn’t want and like to put on a little duckling brooch!?

DSC_0002

The pattern is already available on Free Patterns page, and you can access it from HERE

My goal is to make at least a dozen little brooches. So far have made them 8, but by tomorrow will make another 4 and leave them random places downtown.

my work in progress:ducksWishing you all wonderful Little Yellow Duck day tomorrow.

Vanja

Posted on 74 Comments

Waldorf Inspired Baby Doll

After almost one moth of break from new posts, returning with, I hope, lovable gift to you all.

New crochet addition to all Waldorf admirers.

Waldorf Inspired Baby by AmigurumiBB

Simple testing the head for this pattern has taken our little Facebook group into wonderful doll making adventure. Many new ideas opened and new patterns were created. 25 wonderful and kind ladies have applied to test the pattern. Those that finished came up with the most adorable little princess dolls 🙂 Some we still wait to finish their projects. If ladies agree I will post their photos for all of you to see.

What I am specially satisfied that not matter which weight yarn or size hook was used, the pattern worked well for all.

For the first time we have tried joining limbs with cotter pins, and making joints with whatever we could find at home. Instead of original discs, washers and cotter pins, we mounted cotter pins over buttons, and if cotter pins were not available, wire or paper clips were used. Please feel free to check on home made options on joints. Few photos and how the joints are done I have added HERE

My baby grew to little girl very fast. It is amazing how fast the kids grow these days!!! 🙂 Like mushrooms after the rain. One day I saw her bald and crying and the next one she asked for her hair to be done!

Waldorf Inspired baby by AmigurumiBB

The next day her friend showed ….

Waldorf Inspired Baby by AmigurumiBBKids!!!

🙂

The pattern is pretty long.

Pattern has several additions. I will try to explain what each of them will bring and you cna choose from.

Basic Waldorf Inspired Baby includes instructions on how to crochet baby’s body from head to toe.

This is what you will get with the basic Walsdorf Inspired Baby pattern:

Waldorf Inspired BabyThe pattern can be found and downloaded HERE

During testing the pattern, one of tester ladies and my dear friend wanted to make baby with open mouth, or the mouth baby can place her finger in, pacifier or baby bottle. Based on Waldorf’s baby head she made adjustments and came up with open mouth head which is absolute must have. I warmly recommend everyone to try this technique not just for this baby head, but for any of your baby heads in the future. Thanks to wonderful friend and generous and kind TB Cess, this pattern we can share as addition to basic Waldorf Baby.

Head with open mouth looks like this:

Waldorf Inspired Baby with open mouthand you can open and download it HERE

This head required more bent arms, so the hand and sucking finger can reach the mouth easily. For that reason I adjusted and added one more pattern for arms. Called it Sucking finger arms. You can make each arm different and still keep the same size and proportion of your baby. Rounds on both arms (one you can find in basic pattern and this one) are equal. The only difference is thumb crocheted separately and added later to position you prefer and position that matches baby’s mouth the best, and this arm is bent little bit more in the elbow.

Sample on these arms you can see here:

DSC_0003Pattern can be viewed and downloaded from HERE

Hair for Waldorf doll’s I made and I always make following Beth Webber’s photo tutorial. This is the best one on the web  I have encountered so far and all of you who are following me for long time by now, know that I keep repeating myself and suggesting By Hook By Hand blog any time I can, because Beth always inspires  me  with her doll creations. Her patterns and tutorials are easy to follow and yet all are masterly made.

Photo tutorial on how to make wig for your doll you can find HERE

Following this tutorial I have made simple wig cap, and here are few details.

DSC_0004DSC_0002DSC_0003What I have said to the ladies who tested the pattern, when working on the wig, so will tell you too. Same as with crochet work, in wig making and waving the hairs on, you have right and wrong side. While following Beth’s tutorial, pay attention on how the hairs are waved to the wig. It makes huge difference later. If you will need more help regarding this, please feel free to ask and I will make a short post, showing you through photos what exactly to pay attention to.

At the end what is left are the clothes.

Clothes are crocheted in No.5 thread and still using 2 mm hook. Writing pattern for babies clothes and making it perfect to fit everyone, if you ask me, is the hardest part for most of us who write patterns wishing the pattern will work the same for all.

For that reason I tried to make pattern(s) easy enough so each and every one of you can adjust the stitch count based on yarn and hook used. Important is to work with lighter yarn and adjust the stitch count accordingly. By any chance don’t try crocheting clothes with same weight yarn as doll was made of, or even worse, using heavier one. Clothes needs to be light and fluffy. For this doll I have tried to keep clothes old fashioned.

Created little girlish top,

DSC_0005DSC_0006Nice little pants that can fit the baby even if she wears diapers on,DSC_0007DSC_0008and sock looking booties.
DSC_0009All are very, very easy to make. You can view them or download them HERE

Little by little we came to the end 🙂 I hope I haven’t missed anything.

Hope you have enjoyed seeing this new baby pattern, and even more I hope you will enjoy every second while making one.

For any questions, please feel free to write and ask.

Wishing you all happy, relaxing and blessed weekend.

Vanja

Posted on 25 Comments

Bunny Babies and other Easter additions….

Can you believe I haven’t shared any new pattern in 2015?

This year started with amigurumi lessons (and there are still more than few coming), and even though I worked on my new patterns all these time, haven’t found time to share them here. Have to break that “magic circle”!

Easter is month ahead but I think, it’s not too early to start with preparing and sharing something cute for that occasion.

Bunny Babies! Ta-daah!

Bunny Babies by AmigurumiBB aWhen making these bunnies I really felt as making baby toy, so they ended up as Bunny Babies and are suitable for nursery rooms and baby showers, so not necessarily Easter toy to make. If making as baby toy, stay alert when adding eyes. I suggest to embroider ones, if baby will play with toy (and skip the ribbon).

Bunny Baby by AmigurumiBBBunny Babies by AmigurumiBBPattern for these lovable Bunny Babies you can find under Free Patterns Page, or direct link here

I’ve also prepared two more Easter patterns:

Colorful Easter Eggs

Colorful Easter Eggs by AmigurumiBBand fun and playful Dixie Chick

Dixie Chick by AmigurumiBB

Dixie Chick

Both of these two patterns, for the first time, I offered for sale and you can find them in my Etsy Shop

If you feel as buying me cup of coffee or skein of yarn, please feel free to visit the shop.

Thank you for stopping by and taking time to read this post.

Hope you like new patterns and will find something for you and your loved ones.

Wishing you all wonderful Friday and happy, blessed weekend to come!

Vanja

Posted on 10 Comments

Thumb Wrestling Champions!!!!

Last year my dear blogger friend Jennifer from Squirrel Picnic announced Make it challenge call. Anyone could write suggestions and challenge Jennifer to make something special and unique, something she has never done before. I found it very intriguing and as I was working on one sumo fighter at that time (and was not one easy task to do), I challenged Jennifer to make a Sumo.

Last week I got mail and my very own sumo made by Jennifer arrived!

And not just the sumo! I received a whole wrestlers collection!! Ninja, Luchador and world’s famous Hulk Hogan!

I tried to make a photo with all of them on my fingers, but didn’t manage to focus right so I took different approach and instead of fingers used bunny ears.

These bunny pattern will share with you this week. For now they are my models to show you fabulous, but fabulous thumb wresting toys Jennifer designed.Bunnies

For detailed post and wrestling thumb champions patterns, details and video on how to play thumb wrestling game, you can read and discover on Squirrel Picnic.

You sure don’t want to miss that!!

I am waiting for my son to come, to try the thumb wrestling game, but so far I have been amazed by wonderful work Jennifer made, and not just her work, but her creativity to come up with such a great design.

Thank you Jennifer for such a precious and fabulous gift

and thank you all for taking time to red this post.

Vanja

Posted on 30 Comments

Amigurumi Lessons – creating simple doll

By now we have talked about rounds, cylinders and coins, some of the basic and fundamental shapes you need to know how to crochet and understand how are done if you wish to make your first amigurumi doll.

Now it’s time to crochet those pieces and see how they work together.

The major problem most of you have is not being able to draw your idea to keep it as reference and guide to your work. It doesn’t have to be the drawing, you can find inspiration from clip art pictures online, maybe you liked some plush at downtown shop, or you have a photo of one old doll or toy from the childhood you would like to make. Important is to have an idea on what you wish to make, and to work that idea in details before actual crocheting part starts. Best way is to draw a sketch. It is not essential, but is good way to start.

I hardly ever work with colors when drawing, and most of them are just lots and lots of basic shapes joined together (same as you need for crocheting, so use basic shapes for your sketch as well), and that way I know in advance what I am after. While making the sketch your ideas on what shapes you’ll start and use will grow, and while sketching write them down a side as notes.

Here is sample of simple sketch I make for my designs. Based on this I make notes on how I expect my work will go. This one was done in tiny little notebook I always keep by hand, but for more detailed work I have big sketch book with all the notes written on sides and across the sketch. AmigurumiBB

Important is to help yourself with anything you can. So use all your resources and make preparation before you start to crochet.

To show that you can make your doll for stick man drawing, in the FB group I made this little girl based on which I finished this lesson on basic amigurumi shapes. Stick man drawing is not detailed, but again, can help you guide through your work. And you all know how to make stick man drawing, right?

So let’s start with one simple like that!

stick man drawingIs it getting easier? From this simple drawing everyone of you can do, now we know what we’ll crochet in order to create a little doll.

And with color or two, I wish my doll to look like this!

DSC_0003

Based on what we learned so far, we know how to make rounds to make the head. We can try endless options. Don’t be afraid to try different options for each of your dolls. Experiment! It will not be successful work every time, but from trials and fails you will learn.

With rounds we will star the legs, but then after creating feet (shoes looking bottoms) we can decrease evenly just a little to make the right width for legs we can carry repeating till the top, or as long as we wish our legs to be long. Another option is to make simple cylinders. Will show you the samples later.

Arms, same as legs. We can work them as simple as plain cylinder shape from bottom to top, or we can add little round on the bottom to form hands.

On below photo you can see options on how to make legs and arms. As we are still on basic shapes, and even increasing and decreasing, both, the arms and legs are done same way. If they have larger roundish end on the bottom, it is even on all sides. It is increased evenly, repeated rounds are done 2 times for each of them (but you can work as many as you wish, and that depends on number of the stitches you will use), then increased slightly, but enough to reach the number of stitches I needed for arms (6) or legs (9).

DSC_0011

Body! Body can be done several ways. In this description I will mention only two of them as they are probably the most common and most of you will go after them in first trial. So let’s see what difference each of these two options I decided for are.

DSC_0013

Both bodies are the same length. From above photo you can clearly see the difference. One has more repeating rounds in the middle, but ends short with even decreasing on every second round. While second sample has less repeating middle rounds, but to reach same length, instead of every second, I decreased evenly on every third round.

For my stick man drawing I decided to use upper sample. No special reason, simply thought it’s slimmer and with extra edgings I had in mind on adding to collar and sleeves, the second one will make my doll look chubby.

Now that you have prepared your drawing, and started to make samples for your doll, let’s put pieces together to see what we might expect doll will look like when done.

DSC_0009DSC_0008

I crocheted options for legs and arms. It is more to show you what you can expect from your basic crochet elements and your first doll. If you ask me, I like both of them!

Both ways, simple cylinder legs and arms or those with little roundish ends look great for on this little doll.

But as I am working after my sketch, my doll will have round ended legs, but her arms will be simple and straight. As said earlier, for body shape decided to go after first sample, one that ends more slimmer way.

Sorry I forgot to mention my pattern on this doll’s head. I make dolls for some time now, and for me is not easy to go and make just ball looking head. I think it is because I like to challenge myself on every new project.

The head I made for this doll, I tried to simplify BB dolls head. I just love wider cheek area on doll’s head, and so far you could notice that on almost all of my dolls. I like that smiling expression doll can make without mouth on and that is what these wider cheek part of the head does (at least I see it this way).

So let me explain how I made this round head, BUT…..if you are making your own doll for the first time, try to come up with round shape of your own. Make your own lovely doll you can share with your friends and public. You can do it!

Started with 4 sts in MC

then increased all stitches for 2 rounds, or until I reached 16 sts round. From this round worked on even increases until 32 sts round.

32 stitches round repeated 2 times. Then evenly increased by 4 stitches around and reached 36 sts.

36 stitches repeated 2 rounds. Then evenly increased by 4 stitches around and reached 40 sts.

40 stitches repeated 2 rounds. Now I increased evenly around by 10 stitches and came up to 50 sts round very fast. (this is where I made head wider and made my lovable cheek area 😉 )

50 stitches repeated 5 rounds. I wanted to finish with flat bottom and to reach that I used 10 even decreasing stitches on each of the next 3 rounds

Last one closed evenly to 12, as 12 was the count number for my neck. This way when I sew body and head together they will fit perfectly stitch by stitch.

Now that we have crocheted all doll parts and know which ones we will use to make our dream doll. It is time to decide where we will make color changes. This is where your sketch will help again.

For this part, on how to decide where to add colors I didn’t make any photo, nor I can say more. This part is something you have to make. This is part is what making your doll unique. So take your time to count rows, observe your plain crocheted doll and decide where to add colors in order to create sleeves, shoes, dress…

This is still the most simple way of making your doll! when crocheting the body, leave front loops free to attach and crochet the dress, collar, sleeves, shoes, socks…. anything you wish to add.  Plan in advance.

I am talking about this prototype doll, because this is the way we do in FB group. We start with simple doll. And this is the most simple one one can do. First doll needs to be made plain. No eyes, no colors….simple head and body. From there we go further. First step is to add the colors and add clothes, arrange and position eyes and decide on hair. Second step is making the doll, based on all of the information gathered and decided. As you need to know how to crochet the round, the same way you need to know where to add eyes or wish round to leave free loops for the dress later. If you are starting to crochet dolls, these are all the steps you need to take before you actually make your first doll and write your first pattern.

After this basic doll, and basic pattern, we can continue to expand our knowledge and upgrade to more difficult shapes, and work at all.

Hope this Amigurumi Philosophy didn’t turn me in boring philosopher 😀

For any questions, please feel free to write and ask. I do apologize (again) for all the mails I answer late, but really, really, I have little free time left.  I do answer all of your mail, and again, please be patient; I will get back to you with reply, soonest I can.

If I forgot to mention anything in this part and you think is important and not to be excused, please feel free to point it out and let me know.

For the end let us see how my stick man drawing looks when finished.

Doll from stick man drawing AmigurumiBB

Posted on 5 Comments

How to make body, arms and legs…the basics

From head, round and oval shapes which we use to make one, this week we can move to rest of doll’s body parts and shapes used to create them.Basuc doll shapes

Looking at picture, it looks so easy and simple, right? It is that simple as it looks!
And you still wonder why can’t you make your own doll?
Lets see if this lesson will help.

As you could see from above picture cylinders are the shapes used to create all other body parts, beside the head.
I find cylinders brothers of round shapes. Either they are older (wider)  taller from our round, or are younger (more narrow) taller from our round.
What that means?
The way we started the round is the basic of any other crochet piece we’ll work on. It is always the magic ring or the chain. Magic ring will shape your ends in more round shape, while chain will create oval start and oval shape of your work.
How you start will be the base and will lead your cylinders to grow:
slim and tall ones will be the ones you start and don’t increase or increase one round and continue with repeating rounds for desired length fat and short or tall ones, will be the ones you will work same as round shape, or oval, but then instead of making round, and repeating middle session for few rounds, for the cylinder you will have to go double and more (depending how long one you’re making and what it’s purpose will be).
Cylinder shapes are used for arms, legs and torso.

When making arms and legs in simple cylinder shape it is very simple task to do. With just few stitches and repeating rounds you will create little arms and legs in no time. Here are few samples I made, different stitch counts, but yet tried to work through all of them we used in our first lesson. On this photo I skipped 3 and 4 stitches, as they are really rarely used for arms or legs. Three stitches in repeating rounds are very difficult to work, almost impossible even for experienced crocheters. Four stitches are not impossible to make, but are rarely used and I skipped them gladly. Four stitches and long repeating rounds of them are used when making tails in small amigurumi animals, or, sometimes, when making fingers on your doll’s hands.

On below photo I made 10 repeating rounds of 5, 6, 7, 8, 9 and 10 stitches I started in magic ring. Difference is obvious and for such a small pieces there is not much to say. These are all suitable for small doll arms and legs. Adjust the length by repeating rounds and you will have your doll arms and legs done in no time.

(for cylinders 8, 9 and 10, I actually started in ring with 4, 6 and 5 sts; increased first round to desired number of stitches and continued with repeating shape. That gives me possibility to close magic ring nicely).

DSC_0003

Let’s see what happens with the torso. Torso will require few more increasing rounds and let us see what is happening with cylinder shape there. Same method you can implement if making bigger doll and with it bigger arms and legs.

Torso, together with head, makes one of the largest body part. We will not use blue prints of human body and actual proportions to make doll’s torso, but we have to picture and decide of it’s size, compare it to the head before we start crocheting. For that, the best is to keep picture or drawing of a doll you wish to make. This way you can keep track of what you’re doing and test your progress, compare it with your design as you go. You don’t have to be good at drawing, simple sketch will be enough. Maybe your hand doesn’t cooperate with the brain and eyes when drawing, but based on this drawing your brain will cooperate with you work and make things much easier for you. Give it a try. Draw your doll the best you can and try to follow it as you crochet.

For torso, same as for arms and legs we will use cylinder shape again. I made two little samples I started with 6 stitches in magic ring. One is done with 10 repeating rounds between increasing and decreasing ones, and second with 15 of them. In between I placed round little one, with just 5 repeating rounds so you can compare the sizes.

DSC_0002

I can’t give you magic formula on how wide and how tall to make doll’s torso. This is what makes all this designing and crocheting interesting and diverse.

My lessons I started with rounds and ovals or the head shapes, as most of dolls start from the head. Once you have created and have size of the head you like, the rest of body parts will be easily made in order to match you head the way you wish.

For creating body, same as with arms and legs, make a base. Increase several rounds, but keep in mind not to make body larger than the head. If using same stitch count as one you used when making the head, stop increasing at last two rounds. This will make your body fit nicely to your doll’s head. This is some ration most designers use when making “normal” proportion dolls. I say normal as there are chibi dolls with extremely big heads and tiny torso, arms and legs, dolls in between chibi and normal, normal ones have head somewhat bigger but still remind on traditional doll shape… Whatever doll you will make, keep in mind to make body less wide than the head.

Even though the simple body can be done with easy and simple cylinder shape for most of you it will not be satisfying. Then these tall brothers we work on will call few relatives for help.

And so they come, relatives

cones!

DSC_0005

Simple cones will make nice ears to your animal toys, but you will hardly use exact cone shape on your doll. Instead you need to understand how they are created and how to add them into your work.

Cones are done by simple, even increasing or decreasing round followed by one, two, three and more repeating rounds.
On what stitch number you use when increasing or decreasing, followed by how many repeating rounds you work, will determine how narrow and how fast your cylinder will be, and what shape it will get.

On above photo I have made cones with one repeating and two repeating rounds in between even increasing rounds. Cones are started (from left to right) with 3, 4, 5, 6 and 8 stitches in the magic ring.

If you increase or decrease each round your crochet work will have the shape of round, same beginning or end we talked about in our previous lesson. It will be nice and round. Adding round or two rounds in between each of increase/decrease, you can shape your work to more cone looking piece.
It is still simple shaping, but this way you can form chest and neck area more narrow, or play with shape of your head, arms or legs.

There is no formula or recommendation on how many repeating rounds to use in between your increasing or decreasing rounds. This really depends on what you are after.
If you are novice and just learning how to make a doll, and wish to use cone shape to finish your dolls body, use the same stitch count on decreasing rounds as you used for increasing ones when starting the body. Count rounds!!! That is essential!
Compare the body length to your head (assuming you have done the head first). You don’t want body to be too long. If you are working after blueprint (picture or drawing, try to make comparison based on that). Taking all these parameters in mind, count how many rows will you come up with if you repeat one round in between each decrease, and how many will give you two repeating rounds.
These all matter and these are all the things you have to be aware of and pay attention to when making your doll.

Below are few photos to show you what will happen with your round or cylinder when decreasing on top of your work. I tried to join two crochet pieces, round and cylinders adding the cone on top of them to show you what you might expect from your work. But to get familiar and to understand exactly what are you doing, you will, again, need to practice.

DSC_0003-001 On above photo you can see what will happen if you start decreasing and repeating one round after you repeated only 5 rounds of the middle part. This example shows work  started with 6 stitches round and 6 stitches cone.  This would make nice body shape.

DSC_0004 Above photo showing little round started with 6 stitches, 5 repeating rounds in the middle and cone with two repeating rounds between decreasing rounds (of 6 sts). What do you think? If you ask me, I think it is too long on top.

Lets see how it works on cylinders we previously made:

DSC_0001DSC_0005-001

Each one works fine, don’t you think? At the end, all will depend on the size of ones head and the rest of the body (arms and legs) but 1 decreasing round with one repeating looks very nice to start with when learning the basics.

Just to compare, I added 2 repeating round cones to same cylinders.

DSC_0002-001DSC_0006

Same as with round, even here the top seems too long.

But this is not all. All above examples showed you when you try to finish one piece from cylinder to cone shape using same stitch count on decreasing rounds as you did with increasing ones on the bottom.

Don’t forget that you can mix and match all of them. You can start with 6 but gradually change to 8 and finish with 4 stitches decreases in cone. Or any other way using any other stitch count in your work. This was just one little example on how it looks when 6 sts round shape and 6 sts cone work together.

And again I remind you to practice! This is the only way to get to understand all this and understand your work.

By the end of this week I will try to finish one simple doll, based on these first lessons we made, to show you on exact doll sample how it all works. While working and showing you on doll sample will tell you more about round shapes used on doll’s hands and how to make them. Feet and shoes we’ll leave for some other time. For now we keep on the simple!

Until next lesson keep on practicing and happy crocheting!

Posted on 17 Comments

Cropatched Hearts

Cropatched Hearts

I am sure you got idea what those might be!?
Crocheted patched hearts!

DSC_0010This idea ceossed my mind last week, after few weeks of practicing and all started with…
dear friend Phoebe got me hooked on free form crochet in the last few weeks. She came up with miniature tulips pattern she found at Russian sites. Here is the link to free, freeform crochet tulips Irris made on her blog.
As I started helping her translating the pattern and getting to understand what is there to be done and how…I started to work on tulip petals and my first free form crochet element.
When I discover something new like this, and this free form crochet was absolutely new for me, I go liiiiiittle crazy, and my curiosity and hunger to learn and discover more takes over.
So I went to Russian site and searched for designer who made these little tulips, hoping I will find more elements and more patterns and instructions that will help me understand this free form crochet better. And I did found Iriss and her shop!
Link to Iriss shop and her patterns you can find here. There I bought several of her patterns (I love to read patterns, practice on things I haven’t done before and this way learn something new). My first bought pattern from Iriss was Master Class, as they call photo tutorial with detailed explanations, on all the free form elements she uses in her creations (You should see her Teddy bear covered in freeform).
Dear friends…I felt like a little child with huge candy when I saw all those photos of elements, stitches used and possibilities there are when crocheting freeform.
I am not an experienced crocheter. I know basic stitches, the rest I have to look for and/or follow the pattern, but to create freeform, I always thought one really has to be master.
It doesn’t have to be this way!
As in everything you need to know and understand basics. Once that is set, then one can start creating freeform elements and play with the yarn.

I will not talk about these free from basics.I don;t know them and haven’t learned them yet in order to teach you or explain anything special

Based on my experience and with help of Iriss and her mini tulip pattern, I will show you what you can make in freeform, and from there, same as me, you can explore and search, learn more.

In order to bring all this closer, I asked Iriss for permission to translate and post her freeform petal pattern in English, to show you how to make your Cropatched Hearts. I translated just the petal used in this pattern, for this post. Iriss did give me permission to translate the tulip as well, and we can do that if you are interested in making one. I will gladly translate the whole tulip pattern for you too. Let me know!

Cropatched hearts are lovely! Not that you will make someone special happy and show how much you love him/her/them…but you will learn some of free form crochet, you will use yarn scraps that are hiding some dark corners far away from sight, and will train your creative part of brain while making them and thinking which way to go next, which stitches or color to use….

So let us start with Cropatching hearts!

To start making them we will need some yarn left overs and scraps. I collected some I had in special “not enough to make anything” box, added some skeins of colors I though would be nice to add….

DSC_0002

Then we’ll need some heart base.

You can make amigurumi heart, or you can crochet two flat pieces in order to join them and make puffy one, in order to create nice hanging hearts. Or…if you like, you can go flat, one heart shape as base, freeform elements on top (this would make nice broch).

I have prepared both heart patterns.

Amigurumi heart

Make lobes (x2)

R1: sc6 in magic ring

R2: inc x6 (12 sts)

R3: (inc, sc) x6 (18 sts)

R4: sc18

tie off on 1st lobe. On second one continue crocheting the heart.

R5: Bring the first heart lobe and slip stitch to one of the stitche on R4. ch1, sc17, sl st to starting stitch of the first lobe, ch1, sc18 (35 sts and 1 chain st)

R6 skip sl st and make first sc to chain stitch maid previous round, sc next 17 sts. skip 1 st and sl st, sc next 18 sts (36 sts)

R7: sc36

R8: sc7, dec, sc17, dec, sc8 (34 sts)

R9: sc6, dec x2, sc13, dec x2, sc7 (30 sts)

R10: sc5, dec x2, sc11, dec x2, sc6

R11: sc4, dec x2, sc9, dec x2, sc5

R12: sc3, dec x2, sc7, dec x2, sc4

R13: sc2, dec x2, sc5, dec x2, sc3

at this point you can start to stuff your heart. continue stuffing till the last round if you can. Try to shape nice looking heart.

R14: sc1, dec x2, sc3, dec x2, sc2

R15: dec x2, sc1, dec x2, sc1

tie off, sew the last round closed and hide end. Or leave longer end and after sewing/closing last round bring it up in the middle of lobes and create string to hang your heart later.

Amigurumi Hearts

Flat heart

For this one I used free pattern I found online. Liked this one the best. You can try with any heart pattern you have. Heart coaster pattern, or applique….

Pattern is made by www.tejiendoperu.com, but I couldn’t find the online link. If you can, please let me know and will add it to the photo. Thank you! They deserve to be credited for such an awesome heart pattern! I added the link to their St. Valentine page and few other free heart patterns.

eab8278e8da82897ac887bd457490cd8

And here are my hearts made using this chart. Both will be the base for my Cropatched Hearts later. For each one I made two hearts and crocheted around sided to connect them. Stuffed them as well (white one is badly stuffed, but I will “hide” it with crocheted patches later).

Crocheted hearts

Now will give you the pattern which gave me this whole idea on making cropatched hearts. Writing it before proceeding with how I created my hearts, to make it easier for you to follow my steps later.

Translating this pattern I didn’t use any abbreviation terms. Tried to translate it in more descriptive way. Stitches I didn’t know what are called in English (such as front post cluster stitch), I described even more. For any additional help and clarifications, please feel free to ask.

Here is the petal pattern, translated from original Russian pattern made by Iriss.

Photo of Iriss’s little tulips and petals:

Mini tulips in freeform by Iriss  (http://www.livemaster.ru/topic/253209-mini-tyulpany-s-lepestkami-friform?vr=1&inside=1)

Freeform petal pattern

Working in spiral so don’t feel confused when you see stitches worked one over another in the same round (this will happen in R1 when creating spiral shell shape)

R1: sc6 in magic ring, work in back loops from this part; hdc2 in each of the next 4 stitches, dc2 in each of next 5 stitches
R2: 5 popcorn stitches in each of the next 5 stitches, continue with making 11 bullion stitches
R3: this round is about making tunisian stitches over popcorns made R2. Simply try to loop each of the popcorns and ch stitches to form the base of the first row for tunisian stitch. Some of you will loop more, some, less. Try to come up with 9-11 loops on your hook. Make tunisian stitch for several rows, or that any that you find nice looking and shaping your freeform nicely.
When making petal in Iriss pattern, this tunisian part will form the length of your petal. I used this stitch to cover one side of pink heart (you can see in the photos).
R4: single crochet the right side of tunisian piece made, towards the top and down the left side. Without turning, stitch same round using reverse or crab stitch (this time going from left to right).
R5: ch, turn, having your hook ready to work over bullion stitches made in R2. (dc1, ch1) x11 (dc on each of bullion stitch)
R6: ch1, turn, stitch that is used here I call cluster, but I might be wrong. Will try to explain how it is made. Yarn over and work the stitch as you would front post dc. Pool out the loop, yarn over and draw the yarn through 2 loops. Now yarn over again, draw the hook same way, as making front post dc, pool out the loop. Yarn over and draw the yarn through 2 loops. Repeat this 3-5 times, or as many needed to cover dc you are “hugging” or making these fpdc on. Once all front post dc are done, you will end up with 4, 5 or 6 loops on the hook (depending if you worked 3,4 or 5 hugging stitches). To finish this stitch, yarn over and draw the yarn through all loops. Sc to chain stitch made in between dcs previous round, ch1, and repeat this front post hugging cluster 10 more times (or on top of each dc stitch made R5).
R7: using slip stitches or chains, try to reach the spiral and stitch reverse or crab stitch on front loops left R1.

That will make your first freeform element finished.
Make different size elements, use different colors when working different stitches. If you can’t make heart shape in one piece, make small parts and patch them together on top of you 3D or flat heart.
Possibilities are endless!

Now I can explain how I’ve made my cropatched hearts!

Cropatched Heart by AmigurumiBBWill start with this one as it uses almost all elements of Iriss’s petal pattern.

I started with light blue, or the spiral (hard to see covered with reverse stitch in white), changed color to light yellow and made 5 popcorns following the pattern again.

Next were eleven bullion stitches in pink. Each bullion has 8 wraps. I am not very good in making bullions, but are worth trying. On this one, I could’t do single one at once, so ended with placing wraps from hook to thread with fingers, one by one. Still think they are beautiful. They bring something so unique and special look to freeform elements.

After bullions, I followed the pattern again, changed color to green and made tunisian part.

As I worked tunisian rows, I kept on checking to see how they’ll fit the side. Wanted them this long so I can cover entire half of the heart. When I finished green part, I single crocheted left side of it, in order to reach the middle or center of piece.

There changed color to orange and made R5 & R6 from the pattern (hugging clusters), but to keep and create heart shape, I had to made them less number that from what the pattern calls. This again I kept on testing and trying, placing my work on heart shape base and measuring.Instead of making 11 of them I ended up making just 4 hugging clusters.

Then the purple! This part you wont find in the pattern. I needed something that will create me fan looking shape. I needed these two rows that will form and shape my upper heart part (lobes).

Used stitches there were on orange part, aproximately counted how many I might need for this fan looking shape and used stitches; started from lowest possible or slip stitch, then used single crochet, half double and double crochet. two of each. To return to beginning of row I used reverse stitch in front loops only. Then repeated 2sl st, 2sc, 2hdc, 2dc in back loops and closed again with reverse stitch (front loops). This way I got my lobe done. you can tie off here.

Attached yellow in the center of the piece. Here I Improvised. Did see this stitch being used in freeform, but haven’t practiced it nor done it before.

I worked on single crocheted side of tunisian part (green part) of this element.

Chained 2 skipped 2 and in 3rd st I made 5 double crochet stitches. Chained 1, turned and made those hugging clusters over these dc stitches. If you start from the middle as I did, they will face wrong side front, but as you can see, they look charming like this.

After you make your hugging clusters add light blue and make tunisian over clusters. Each row they will decrease on the end what will shape your bottom of the heart. To connect them to purple part, simply slip stitch and return to making new row of tunisian.

It is freeform, so improvise 😀

Use the light blue to single crochet all around your freeform heart to make it easier to sew and attach to your base heart later.

In my work I made patches on front side of the heart. Back I left clean and clear. You can make patches for both sides. Try and see which you like better.

Hope the petal pattern and this little explanation on how I made my cropatch will help yu get started.

Once you start moving, you will see, it is not so difficult, and it is a lot of fun.  Here are few more photos of work in progress I have, to give you ideas.

Cropatched Heart by Amigurumi BB

DSC_0008DSC_0009

Use different yearn weight to achieve different sizes of shapes. Experiment with the hooks. As I mentioned earlier, if making heart in one piece is to difficult, cut it and make small pieces instead and then sew them all together later. That is why we call this CroPatched Hearts! But most of all, try to relax and have fun creating something unique and special for someone you love!

Hope you enjoyed, and like me, learned something new. I always feel so happy when I can share something new I learned.

Big thank to Phoebe who found mini tulip pattern that make me start exploring this wonderful field of freeform crochet and in same time making me meet wonderful designer Iriss and her shop. And off course, huge thank to Irina (Iriss) who made mini tulips in free form and this beautiful petal pattern, granted me permission to translate and share it here with all of you.

And THANKS to all of you for staying with me and reading this loooong post!

Hope you had fun!

Regards,

Vanja

Posted on 35 Comments

Understanding Round and Oval Shapes (in order to create head)

Understanding Round and Oval Shapes

(in order to create head)

There is no animal or doll toy without head. Understanding and learning how to make one is essential when creating your toy.

This simple round shape used to create head, as all of amigurumi elements, also has endless possibilities.

You can make simple sphere. With simple one you can never go wrong. You can make wider top and slimmer bottom or vice verse. You can make it squarish looking or go some three edges weird shape if creating one alien.

Many possibilities and you are not sure how?

Let me know if you’ll find out how, after this lesson!

This lesson will talk about basic round and oval shapes made with even increasing stitches to form the shape’s width and even decreasing stitches to close it.

Most commonly used are spheres. Specially common are spheres starting in magic ring with 6 single crochet stitches.

Why is that so? Let me show you on examples:

DSC_0001

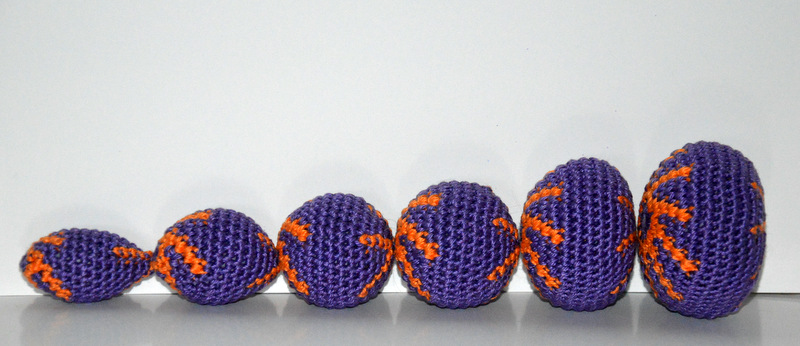
As you can see from above photo, I have crocheted several different rounds. Each one I started with different stitch count in the magic ring, increased evenly for 5 rounds, then repeated last round stitch count for the following 5 rounds and evenly decreased in order to close.

Increases are made in orange colored yarn for you to see what is happening in each work.

If you ask me, I like all of them, even the rounds starting with 7 or 9 stitches that are not in this photo but I included them in this lesson as well.

All of the rounds increase nicely and all are creating nice rounds to start with.

I am sure you will agree with me.

Now let us see how they look from the side view.

DSC_0003

Aha! So that is the difference!

Can you tell?

Depending on how many stitches you use to start with, it will apply to your work. The less the stitches, the narrower the work. More stitches you start with, the faster you will reach desired width.

The more stitches you start with, the more repeating s in the middle rounds you’ll need to do in order to reach nice and round shape.

By now you can guess why is the 6 stitches in magic ring very popular (5 sts as well). They find themselves in the golden middle.

So why to bother talking about all other possibilities?

They all matter and are all important. Furthermore, you need to understand all of them in order to make your head desired shape.

Each one of them talks different story and will make your work look just the way you imagined. Many times, you won’t find yourself satisfied with simple 6 increasing rounds on top and decreasing to close. Many times you will need narrower head on the bottom or in the middle or longer neck to create…

That is why all these stitch counts matter and are important for you to understand.

Let us talk a little about each one of them.

DSC_0007

3 sts start/inc/dec

Very rarely used, but is nice for small works and cone shaped heads for example. It will always have this pointy, sharp end because of only three stitches used in the magic ring. Increasing/decreasing will go slow. 3 stitches each round is not much, but remember and use it if you are looking for something pointy on top. Middle part, if done will make this cone looking beginning start to look as spindle-shaped. Not the round shape but nice one to use for small heads, flower buds…

3 sts inc/dec are great to form edges on your head. Adding them inside you work will shape your head little bit better and give nice edges touch. For example, try adding them right after you finish creating your top of the head, and use 3sts increase to form the forehead and back of the head. Or use it around nose area two even increases on sides and make one just above where nose will be. This will make your nose pointing more. These are just few samples crossing my mind as I write.

4 sts start/inc/dec

I love this one! It makes great squarish looking shape, specially if you add chain in the middle of increasing stitch. That chain points your increases and nicely forms the shape of a cube or rectangular.

Great stitch to use when forming the body (and we will talk about it more in our advanced lessons).

Making roundish shape as seen on above photo samples is something to use if 3 is to narrow and you are not looking for a round shape as you would reach with 5 sts.

If looking for a square head to make, use this one as your guide and don’t forget the chain in the middle of each st when increasing! 4 is great to use on the bottom if you wish to make fine looking neck. Great as well to forming heads middle….

Make sure to make a sample and try it on. I am sure you will be pleased with result.

5 and 6 sts start/inc/dec

Placing 5 and 6 sts together as they give very similar results. They will both create nice round top and nice round end when closed. For as simple round and sphere go after these two options. Many will always got after these two, as are simple to count and work with.

7 sts start/inc/dec

Very rarely used, but again great one in my opinion. Many times you will not be satisfied with 6 sts to work with and 8 will be too much. 7 can be added and used as great alternative.

DSC_0010


DSC_0012

8, 9 & 10 start/inc/dec

Large number of stitches used in the start create wide rounds quickly. These are specially useful when working with thin yarns or thread. They provide faster development of your top of the head and make your work much easier.

DSC_0016

DSC_0013

Like I said. Creating the head is not just making the sphere. Above we mentioned basic rounds you can use in your creations. But, there are some other options as well.

What if you start with 10 sts in the magic ring, increase evenly few rounds and start decreasing and closing your work with just 5 even decreasing each round?

What if you start with 4 and change your mind to close with 8 or 10 sts decrease?

Everything is possible and you can work either way. From above mentioned basic shapes and stitches used, you can make a mixture of all and create something extraordinary.

That is why you need to practice. You need to get familiar with the shapes and understand what happens with each of the stitches used.

If you are really keen on learning I suggest you make samples, like I did for this lesson, for your future reference (or until you become familiar with the work) and use them as your guides when creating your own toys.

On how to count rounds and knowing how many you’ll need in order to reach desired shape I will talk more after we finish all of the basic lessons, but for now can tell you to make these samples and simple measure the round height in order to calculate approximate number of rounds needed in your work. Like I said, use samples to guide you. Measure them, observe them, make two three with different round counts and write notes. This is how you will learn.

Keep your notebook and pen at hand. Write down what you do. You will need to calculate stitches all the way, but all these little troubles are worth it. Making something of your own is priceless.

Now let us return to making rounds using different stitch counts and different increasing/decreasing counts.

DSC_0002-001

As you can see from above photo, this little ball I started with 10 sts in the magic ring, but finished with 5 even decreasing on each round (the photo is up side down).

As a result, I had just few increasing rounds and reached 40 sts round count very fast. Just three rounds needed to reach 40 sts. Repeated 40 sts for 5 rounds and then started to decrease evenly (but this time 5 sts decrease). This decreasing took me double the rounds than increasing, but as a result my doll would end up with nice longer chin and neck area.

Vice verse, if I started with 5 sts, I would end up with nice round and deeper top of the head, but there would be no chin or neck space at all. Head would be cut on the bottom sharply (because of sudden 10 sts decrease).

The same way you can use any of the above mentioned stitch counts in order to create special effects.

For now practice with these simple shapes. Even increasing/decreasing or different stitch increasing/decreasing on top and bottom. Find the one you like the best. Write it down as you first head pattern. You will have one part of your toy done!

Dear friends we are not done yet!

We haven’t said anything about head shapes starting with chains! Or famous and lovely ovals!

These shapes are pretty awesome, but very rarely used in the Western countries. Our Chinese and Japanese amigurumi artists are using these shapes very commonly. I think we, “wild West” people are little lazy to count when making these oval shapes!

Oval shapes are wonderful for animal heads, rug doll look-a-like crochet dolls, baby rattles and baby toys….And are not difficult to master!!!! So don’t be afraid to take your hook, pen and paper and try making oval shaped head or body on your own.

I have prepared few of basic patterns you can use.

You can increase more on sides or more on the corners (depending what are you after, depth or width of the shape). But try working on them! You will be surprised how beautiful they are and how beautiful shapes they create.

For this purpose I have made one sample.

DSC_0017

On above photo, you can see round and oval shape. Round is made from 6 sts started in the magic ring, while oval is made from 6 chains. Both are done in rounds.

When making ovals, specially if making one that will be worked together and continued work with the body work in closed rounds or rows. Meaning, ch1 on beginning, and sl st to chain made in order to finish the round. This will keep your work straight.

For small elements, ovals done in rounds work fine.

As you can see from the photo, oval is increased only on sides. Evenly, each row, but on sides only. This makes it much wider than regular round shape.

In the next photo are three samples. Round, round started from chain (but continued with increases and decreases as worked in round) and oval with side increases (decreases) only.

DSC_0020

They are all lovely, don’t you think? And all can be used for something different.

One thing you have to remember the more chains you use to start with the wider the work will be (no matter how you will increase).

This starting chain is forming your shape and width of the head.

Here are few of the oval patterns you can practice on:

ch6

R1 sc4, 3 sc in last ch st, work around chain, sc3, 2 sc in the last (12)

R2 inc, sc4, inc x3, sc4, inc x2 (18)

R3 sc, inc, sc5, (inc, sc) x2, inc, sc5, inc, sc, inc (24)

from here continue on your own…

each red marked sc, increase by 1, each blue marked stitches increase by 1

Your next round would be as follows:

R4 sc2, inc, sc6, (inc, sc2) x2, inc, sc6, inc, sc2, inc (30)

After you reach desired width, stop increasing and continue with repeating stitch count rounds.

My suggestion is to work in closed rounds or rows.

Each round start with ch and end with sl st to that chain.

  • The same way you can start with chain 9

sc in each sts until you reach the last chain stitch. Make 3 sc in the last, continue working around the chain. Sc next 6 sts and inc or make 2 sts in the last ch stitch. This way you will create first round of 18 sts and in start make your work wider. Following rows continue based on instructions given above.

  • Or start with chain 12, crochet as explained above and start with 24 stitches in R1.

Those were ovals started with chain and increased by 6 stitches evenly on each side.

Here are examples on how 4 increases can be done.

Ch 9

R1 sc7, 2 sc in the last ch st, continue working around chain, sc7 (16)

R2 inc, sc6, inc x2, sc6, inc (20)

R3 sc, inc, sc6, inc, sc2, inc, sc6, inc, sc (24)

R4 sc2, inc, sc7, inc, sc4, inc, sc7, inc, sc2 (28)

continue the same way increasing red and blue by 1 and green by 2 sts

Here is another 4 inc example:

ch9

R1 sc7, 2 sc in the last ch st, continue working around chain, sc7 (16)

R2 inc, sc6, inc x2, sc6, inc (20)

R3 inc, sc8, inc x2, sc8, inc (24)

R4 inc, sc10, inc x2, sc10, inc (28)

continue increasing each round and changing red marked stitches by 2

Your next round would look like this:

R5 inc, sc12, inc x2, sc12, inc (32)

If you have some you came up on your own, post it in comments under Lessons Page and I will add them in this post as well.

By now you learned about classic rounds and different stitches you can start them with. Classic rounds that can be worked with different increases and decreases on top and the bottom. To them you can implement and work with ovals as well. All together will help you make your desired shape.

There is only to make conclusion and leave you practice on heads until next week when we will talk about cylinders (open, closed…) and their uses for arms, legs and body.

Make a simple drawing of the head you would like to do and try making one using these simple basics.

For now make just a head.

Wait for the body to start with until we finish the lesson of basics on increasing and decreasing in order to form the shape other than round or oval.

Hope you have enjoyed and more important that you have learned something new.

See you next week with new lesson

Posted on 22 Comments

Amigurumi Philosophy

Understand and learn how to create your amigurumi

As in my previous post was announced, this year will start school (on Facebook) where I will try to teach all attendees on everything necessary to make their own amigurumi and write the pattern. In the group we will talk and practice more on how to make a doll but these lessons, that I will regularly post here on the blog, can be implemented in any toy you wish to create on your own.

My class is starting next week. I am sorry I can’t invite all of you to join, but you have to understand that I physically can’t follow you all (even though I would love to be a super woman with super powers 😀 ). Students will have practical work to do which I have to follow by making samples after them, in order to guide and help them best I can. Right now there are 100 of them who joined and even that is way above what I can physically take.

In the future there will me more of such classes, which you will be able to attend and ask whatever you might need help with.

Everyone who knows how to make single crochet, increasing or decreasing stitch can make amigurumi toy!

There is a lot things to explain. I will take my time to describe and bring it to you in the most simple possible way in order to make you understand how all this works.

It is not just knowing the shapes. All of you know how to make a cylinder or round shape, but for many it is still taboo when it comes on taking the hook and starting to make something from scratch.

Once you understand and become familiar with what happens if you start with certain number of stitches in the magic ring and what you are doing with increasing/decreasing during your work, or why sometimes patterns start with chain….. then you will be able to start your work and direct it in the way you imagined and make doll you wish.

Understanding these basics, and with little practice, in no time you will be making your very own toys and creating your very own patterns.

Read, make notes, practice. That is the best way to learn.

Each lesson I will add as post, and will add new page you can open on it’s own and read only on these posts and Amigurumi Philosophy (as I like to call it).

You can leave your comments there and ask questions and I will do my best to reply them and help you if I can.

Even though I will try to write about all I know, there will be things I might miss. It is huge field to cover and I will work in details. Please feel free to write and ask me to explain something in your opinion I’ve missed. Lessons will be updated accordingly.

Lessons will be divided in sections.

There will be three major parts:

  1. Understanding the basic shapes or elements based on even increases and decreases in work
  2. Understanding advanced techniques (which includes, seamless crochet, adding different stitches to achieve texture, increasing/decreasing in order to form shapes and sculpt your work, making corners, divide rounds into two, three or more sections….)
  3. Details: eyes, hair, clothes…..

Each part will be divided in mini lessons. For example, Part one and the basics on shapes and elements will be divided in round shapes to make you understand how to create the head (or the body), tubes, cylinders and ovals (body, legs, arms, necks and all other parts that can be created with these shapes).

Basics on increasing and decreasing and amigurumi shaping (what happens when you increase or decrease evenly every round, every second or every third round…..

Last lesson in Part one will talk about sewing parts together.

As you can see, there is no lesson on how to write the pattern. I haven’t forgotten about it, but once you understand Amigurumi Philosophy and learn these basics, writing the pattern will follow naturally. All you will need is to write down your idea and try to crochet one.

Part two is more advanced. It is not taboo, and as with basic lessons, I will break the advanced ones to easy to follow details as well.

Each sample will be photographed and pattern will be explained. This will give you opportunity, not just to see how something is done, but to try to make and learn yourself.

In my online classes I will have little tests for my students. Will try to make few for you too. Simple tests to make you practice and help you improve what you have learned.

It will be fun!
Don’t forget to come weekly and check up on new lessons!

Understand and learn how to make your amigurumi

First lesson is about round shapes. What difference does it make if you start in circle or with chain? Does it matter with how many stitches you start? Continuous rounds or rows to work with?

Answers to these and much more will be explained.

See you all soon!

Vanja