
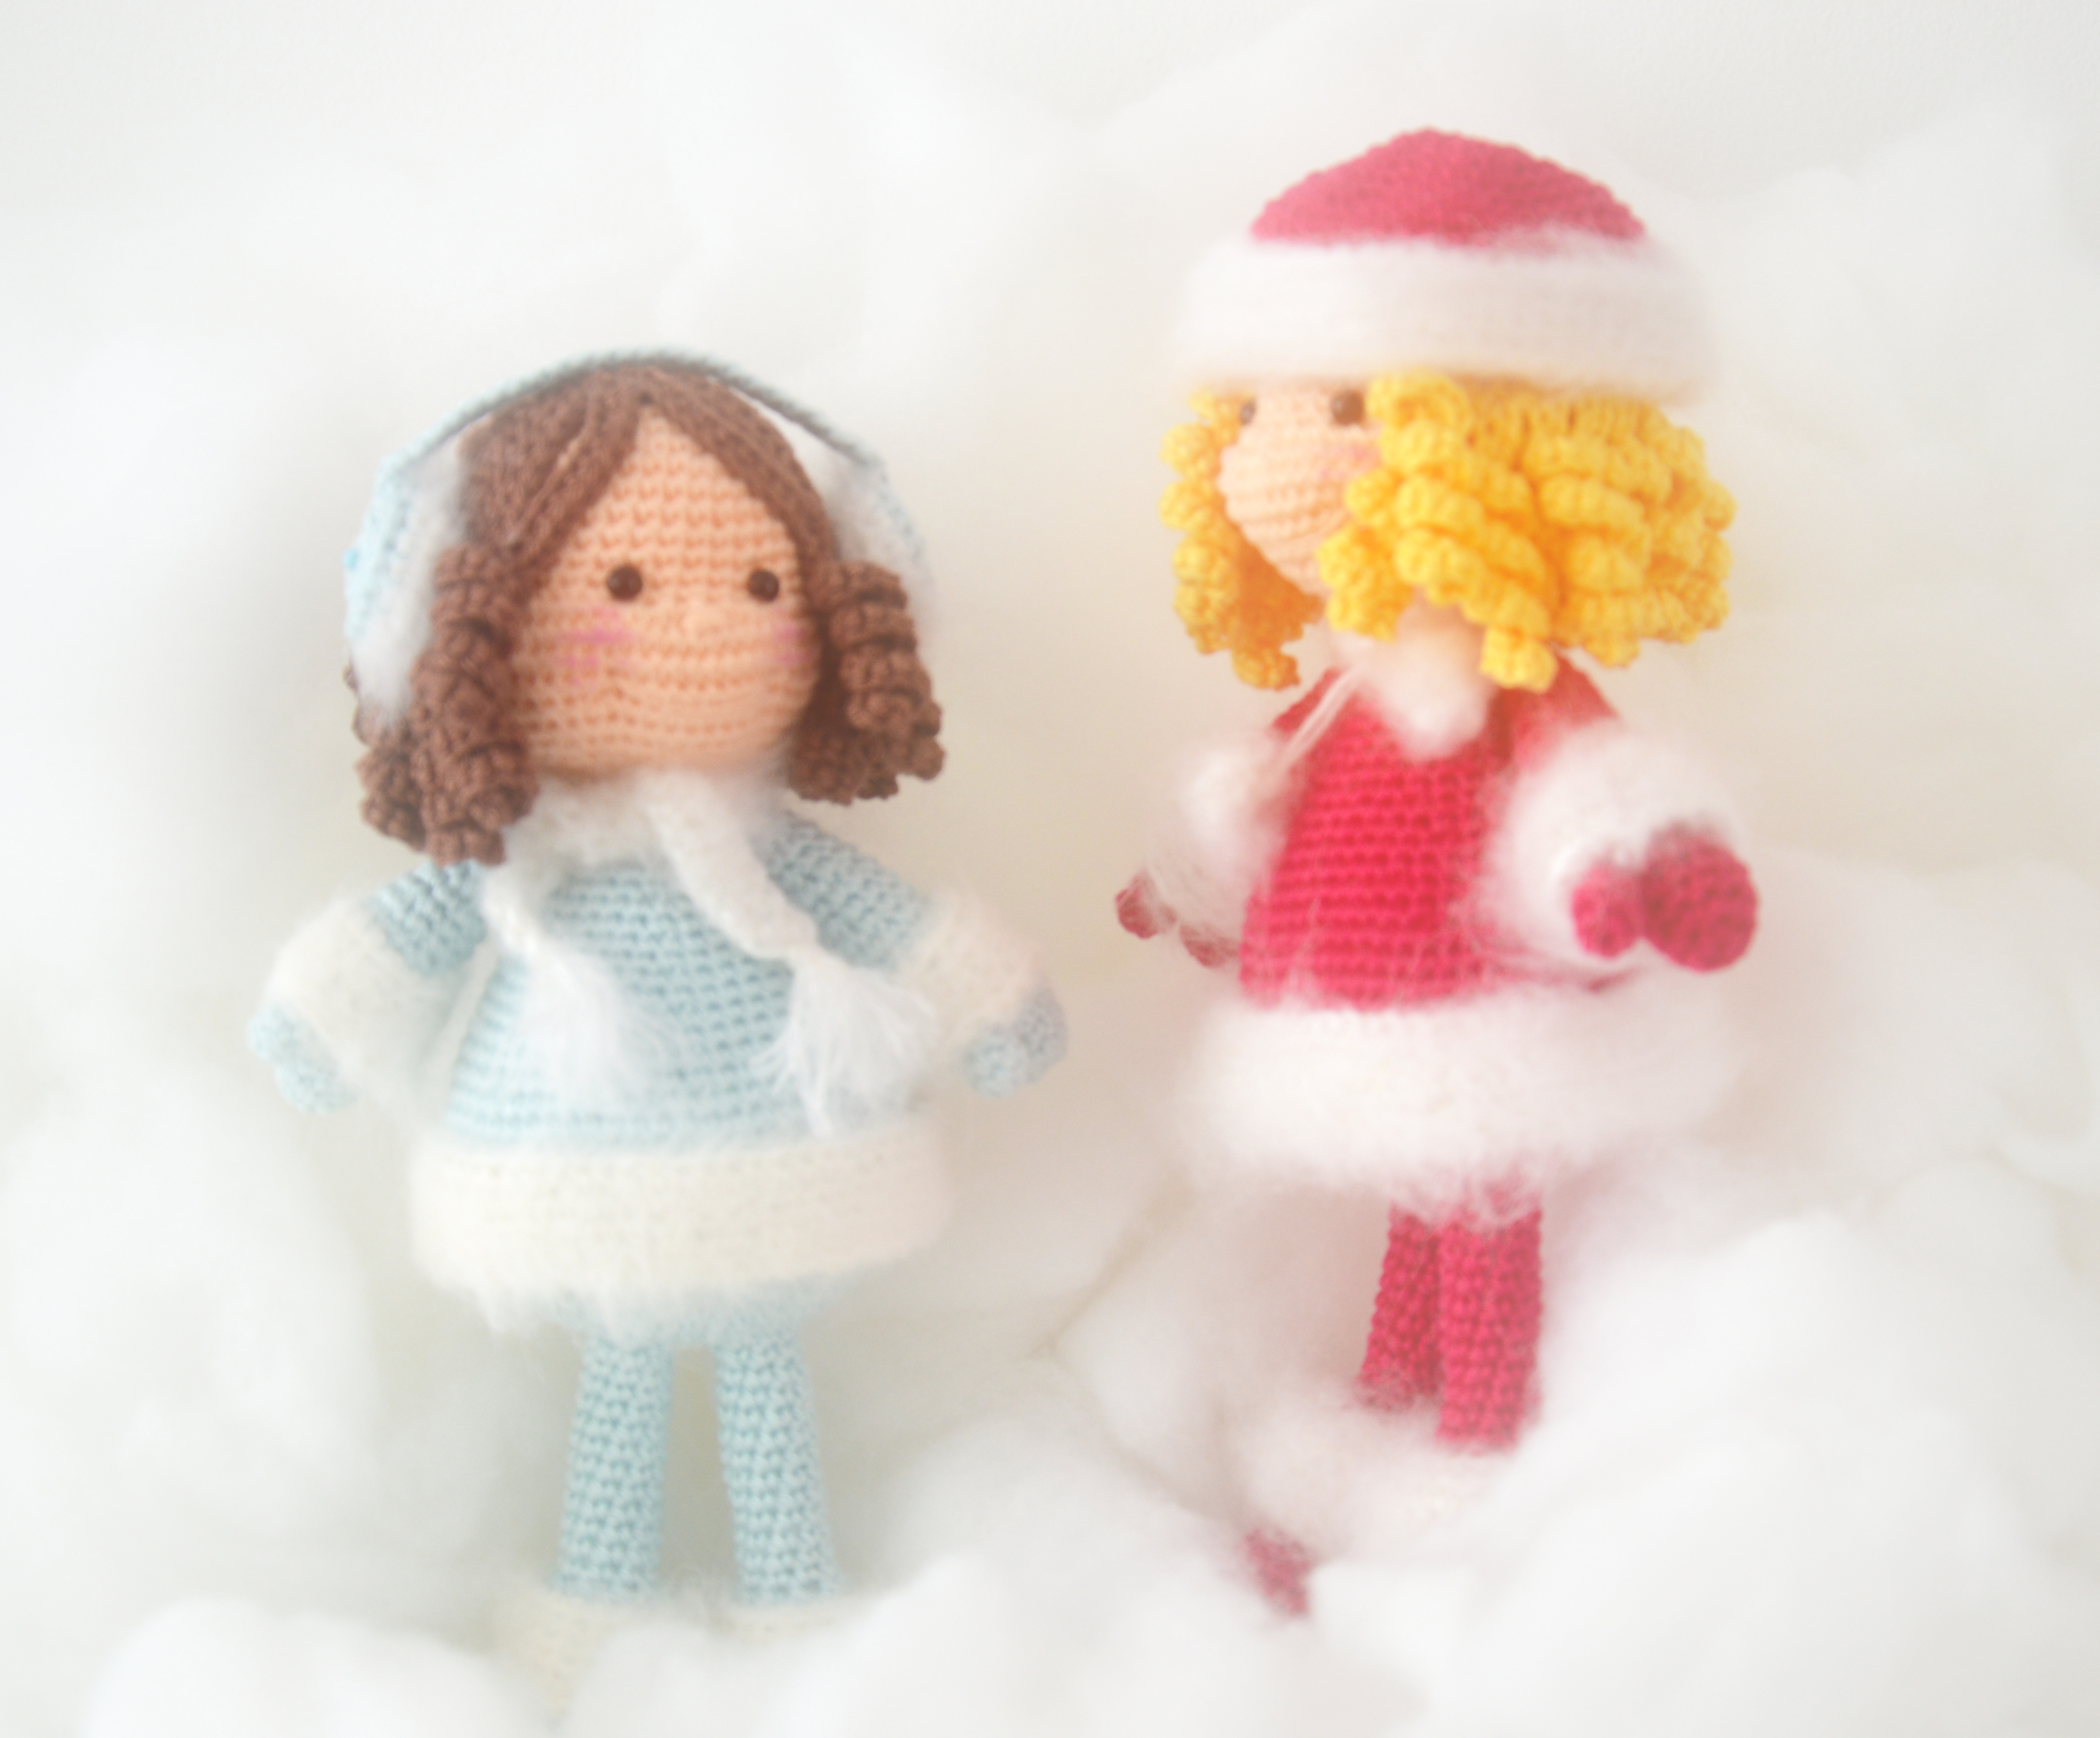
It is never late to start preparing for the winter season and by season I mean Christmas! Have many ideas for new patterns this year and hope I will have time to make and share all of them with you.
Starting with my new Winter Dolls. Elf on the shelf and his mischief girlfriends are coming next and then if time, will show you little smiling snowflakes and this year’s additions to Christmas ornaments.
Let us start with little Winter Dolls!


Materials needed:
- double knit cotton in desired colors (body, clothes, hair)
- white yarn that fuzz well when brushed
- 2 mm crochet hook
- pair of 5 mm round black beads or same size safety eyes
- darning needle (for sewing the parts together)
- stuffing of your choice
- slicker brush
- textile glue (for hair)
- cardboard pieces or anything else you can use for extra support in the soles of doll’s shoes.
- Old pencils or wire (for extra support inside the legs)
Work in continuous rounds unless specified different. Try to make tough and firm stitches. Stuff firm!
When worked in DK yarn and 2 mm hook, finished doll measures 20 cm (7.9 inches)
Abbreviations used:
st(s) – stitch(es)
sl st – slip stitch
sc – single crochet
blo – back loop only
bpsc – back post single crochet
R – round/row
inc – increase (make 2 stitches in one stitch)
dec – decrease (make 1 stitch out of 2 stitches)
** repeat what in between by X times that follow right after

Pattern instructions:
Head
R1 sc6 in magic ring
R2 inc6 (12 sts)
R3 *inc1, sc1 * x6 (18 sts)
R4 *inc1, sc2 * x6 (24 sts)
R5 *inc1, sc3 * x6 (30 sts)
R6 *inc1, sc4 * x6 (36 sts)
R7 *inc1, sc5 * x6 (42 sts)
R8 to R13 sc42 sts (each round)
if you are using safety eyes, your eyes will come in the middle of these two rounds (R13-R14). Make sure to mark the middle of the face (round below you will embroider tiny doll’s nose around 2-3 horizontal stitches). Leave 4-5 stitches between eyes.
R14 inc12, sc30 (54 sts)
R15 to R17 sc54 sts (each round)
R18 *dec1, sc7 * x6 (48 sts)
R19 sc48 sts
R20 *dec1, sc4 * x8 (40 sts)
R21 *dec1, sc2 * x10 (30 sts)
R22 *dec1, sc1 * x10 (20 sts)
start stuffing. Stuff the head nice and firm
R23 *dec2, sc1 * x4 (12 sts)
tie off leaving long end for sewing the nose and to do face sculpting if desired. Finish stuffing.
On how to needle sculpt doll’s face you can find here.
Legs (make 2)
ch6
we will work around the chain in order to create oval shape for the foot.
R1 sc4, 3sc in the last chain stitch, continue working around the chain, sc3, 2sc in the last chain st (12 sts)
R2 inc1, sc3, inc 3 sts, sc3, inc 2 sts (18 sts)
R3 sc1, inc1, sc4, inc1, sc1, inc1, sc1, inc1, sc4, inc1, sc1, inc1 (24 sts)
R4 sc2, inc1, sc5, inc1, sc2, inc1, sc2, inc1, sc5, inc1, sc2, inc1 (30 sts)
R5 working back post single crochet, sc30 (30 sts)
R6 to R8 sc30 (each round)
Using some scrap cardboard, create the sole for the shoe and place it inside. For additional firmness you can glue it to inside, on the bottom of the shoe.
R9 sc6, *dec1, sc2 * x4, dec1, sc6 (25 sts)
R10 sc4, *dec1, sc1 * x5 dec1, sc4 (19 sts)
R11 sc8, dec1, sc9 (18 sts)
R12 BLO 18 sts
R13 to R21 sc18 sts (each round)
stuff the bottom of the shoe very firm.
R22 BLO this round dec9 sts (9 sts)
R23 to R34 sc9 sts (each round)
Tie off. Before stuffing decide if extra support (wire or similar) will be added. Measure, cut and add together with stuffing.
Body
R1 Bring both legs together. Both pointing same direction. Mark three stitches on each leg, those that you will touching each other when legs brought together.

Slip stitch to the first stitch facing you (on either one of the legs, or either side), and chain 3 sts.

Bring the next leg close and slip stitch to the opposite stitch on the second leg, one that is closest and matching stitch you started the chain.
Slip stitch to the next stitch of the same leg. Chain one stitch, turn your work and single crochet 3 stitches on the chain you previously made).
Once done with 3sc, slip stitch to the middle stitch on the first leg. Slip stitch to the last stitch, chain 1 st, turn.
One more time, make 3 single crochet stitches (2 row on your chain, connecting legs).
Slip stitch to the remaining, third stitch on the opposite leg, chain one turn.
What we just did, we increased the gap between the legs, but we haven’t change the stitch count.

Now, stitch around making 18 stitches. (3 over space between legs, 6sc one leg, 3 space between legs, 6 sc second leg) (18 sts)

R2 *inc1, sc2 * x6 (24 sts)
R3 *inc1, sc3 * x6 (30 sts)
R4 *inc1, sc4 * x6 (36 sts)
R5 *inc1, sc5 * x6 (42 sts)
R6 *inc1, sc6 * x6 (48 sts)
T7 *inc1, sc7 * x6 (54 sts)
R8 *inc1, sc8 * x6 (60 sts)
R9-R12 sc60 sts (each round)
R13 blo 60 sc
R14-R15 sc60 sts (each round)
R16 *dec1, sc8 * x6 (54 sts)
R17 sc 54 sts
R19 *dec1, sc7 * x6 (48 sts)
R20 sc48 sts
R21 *dec1, sc6 * x6 (42 sts)
R22 sc42 sts
R23 *dec1, sc5 * x6 (36 sts)
R24 sc36 sts
R25 *dec1, sc4 * x6 (30 sts)
R26 sc30 sts
R27 *dec1, sc3 * x6 (24 sts)
begin stuffing and continue as you go. Stuff the body as firm as you can.
R28 sc24
R29 *dec1, sc2 * x6 (18 sts)
R30 sc18
R31 *dec1, sc1 * x6 (12 sts)
R32 sc12 sts
finish stuffing the body, tie off leaving long end for sewing body to the head later.
Arms (make 2)
thumb (make thumb before starting the mitten)
R1 sc5 in the magic ring (5 sts)
R2-R3 sc5
tie off
mittens
R1 sc5 in the magic ring (5 sts)
R2 inc5 (10 sts)
R3-R4 sc10
R5 bring thumb, start stitching on the thumb first, sc5, continue stitching the mitten, sc10 (15 sts)
R6 blo sc15
R7-R10 sc15
From round 11 to round 20 decrease 1 each round. Stuff the arm as you go. Leave the top of the arm empty or stuffed very light.
R11 will make 14 sts
R12 13 sts
R13 12 sts
R14 11 sts
R15 10 sts
R17 9 sts
R18 8 sts
R19 7 sts
R20 6 sts
Tie off leaving long end for sewing arm to the body.
Here is how your doll should look before sewing her up Hair
Hair
starting from the magic ring
Each chain we make (4 of them) will start and return to this magic ring. Do not close the ring until the hair is done completely.
*sc1 in magic ring, ch31 – starting from the second chain stitch inc20, sc10* x4
R1 sc5 sts in magic ring, ch1, turn
R2 inc5 (10 sts) ch1, turn
R3 *inc1, sc1 * x5 (15 sts) ch1, turn
R4 *inc1, sc2 * x5 (20 sts) ch1, turn
R5 *inc1, sc3 * x5 (25 sts) ch1, turn
R6 *inc1, sc4 * x5 (30 sts) ch1, turn
R7-R12 sc30 each row (ch1 and turn)
R13 *ch21, starting from second chain from the hook inc20, slip stitch to the next st, sc to next st* repeat until you make 15 curls.
Tie off. Close the magic ring. Hide ends.
Glue the hair to the head. Arrange fringes the way you like them to be.
Hat
R1 sc6 in magic ring
R2 inc6 (12 sts)
R3 *inc1, sc1 * x6 (18 sts)
R4 *inc1, sc2 * x6 (24 sts)
R5 *inc1, sc3 * x6 (30 sts)
R6 *inc1, sc4 * x6 (36 sts)
R7 *inc1, sc5 * x6 (42 sts)
R8 *inc1, sc6 * x6 (48 sts)
R9 blo48 sts
R10-R13 sc 48 sts
Fuzzy edgings:
- dress
- boots
- hat
- sleeves
Edgings can be done many ways.
- Crochet fuzzy ends directly on doll
I used mixture of mohair and acrylic yarn (that I brushed later), and crocheted it directly to doll, using front loops we left free on some rounds.
If you are going to do this, make sure yarn is similar weight to yarn you made your doll with, so your stitches don’t stretch to much being too small or they don’t end up bulky and much heavier than coat or hat or boots.
My yarn was much thinner and lighter that cotton I used for the doll, so I worked with two treads to reach desired thickness. I crocheted directly on the doll, making same stitch count of those front loops left and stitched each piece for 5 rounds. Brushed after I was finished.
2. Crochet stripes and sew them on the doll later
What you can do instead is to make stripes. Use the width of those 5 rounds we left on top of the boots, hat or sleeves.
Make the chain, measure it so the length fits your piece all around and make few rounds with single crochet stitch until you reach the width that suits your piece. If you are going to brush it. Brush it now, before sewing it on the doll. Then sew the stripe using front loops as your guide to position them evenly and sew nicely.
Using this method, what will be the easiest one for many of you, you can add any yarn you have available.
- Use scraps and pieces of wool leftovers (you can add them with glue or you can felt them on)
- Use scraps and pieces of some fuzzy fabrics you have
Suggestion: add the fuzzy yarn to your doll before sewing the parts together and if possible brush them before sewing as well. On the photo below you can see I brushed arms. Believe me that brushing legs was difficult with both of them stuffed firm and connected to the body. Try to avoid my mistake and brush legs before making body.

And that is it! Your Winter Doll is done. Hope you will enjoy this pattern and this Christmas surprise someone with one of these little cuties. For any help or questions you might have regarding this pattern, please feel free to contact me.
Wishing you all wonderful rest of the week! See you soon with something new!
Vanja
[…] http://amigurumibb.com/2014/11/10/winter-dolls/ […]
I love your patterns. You are such a talented artist. My question to you is I cannot print as I do not have a printer but I do have the function print friendly would it be okay to do a pdf form of your pattern for my personal use? I appreciate any answer you may give.
I have found the link for the pdf thank you for making it possible your work is just outstanding
I absolutly love you creations. I could only wish to have such talent, but I don’t 😌 so I keep your patterns. Just beautiful work. Thank you so very much for sharing with us.